
Disorganized contact data can hurt your sales efforts – leading to missed follow-ups, duplicate outreach, and unreliable forecasts. Centralizing your contact management ensures your team works from a single, accurate system where emails, calls, notes, and tasks are unified. With Teamgate, you can assign clear ownership, automate reminders, and streamline follow-ups, helping your team focus on closing deals instead of searching for information.
Here’s how to set up shared contact management effectively:
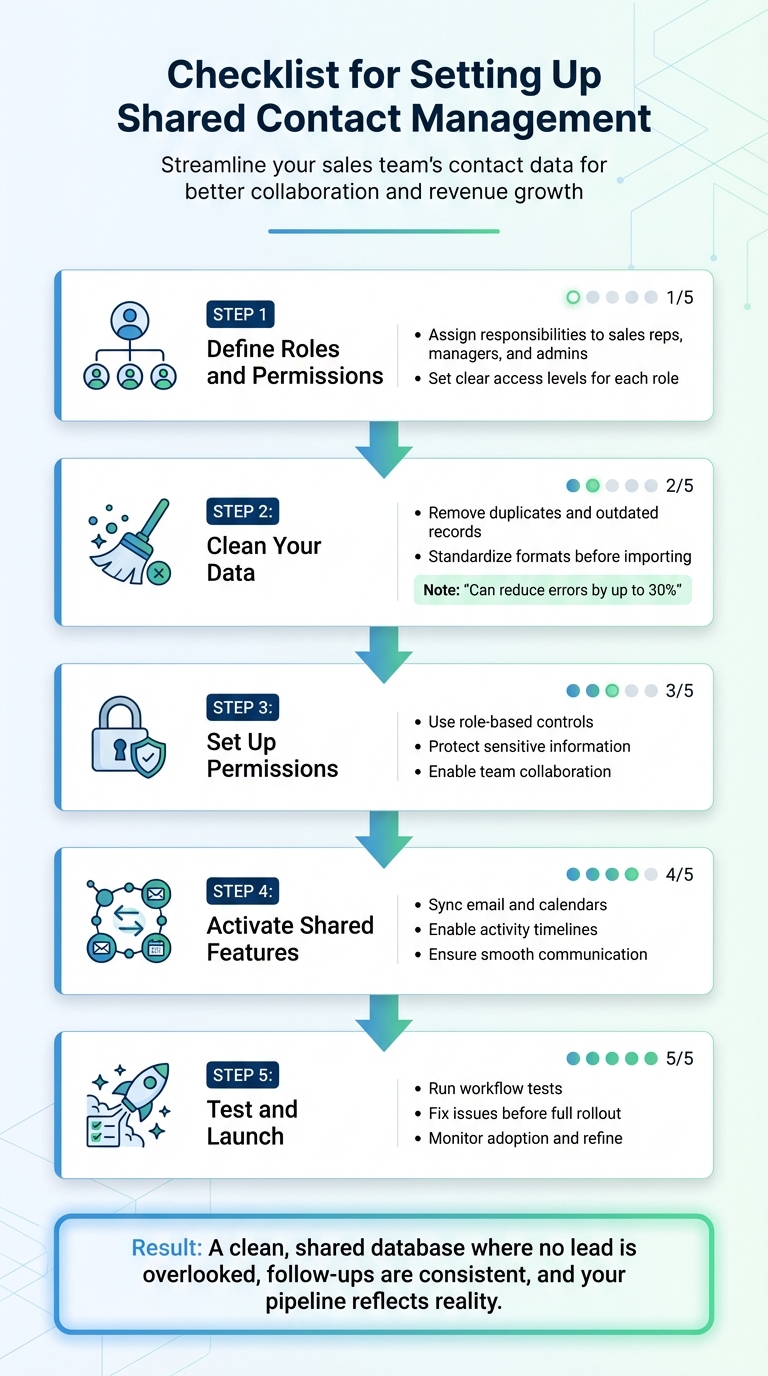
- Define Roles and Permissions: Assign responsibilities to sales reps, managers, and admins with clear access levels.
- Clean Your Data: Remove duplicates, update outdated records, and standardize formats before importing.
- Set Up Permissions: Use role-based controls to protect sensitive information while enabling collaboration.
- Activate Shared Features: Sync email, calendars, and activity timelines to ensure smooth communication and alignment.
- Test and Launch: Run workflow tests, fix any issues, and monitor adoption to refine the process.
Teamgate helps growing sales teams maintain clarity and structure without the complexity of bloated CRMs. A clean, shared database ensures no lead is overlooked, follow-ups are consistent, and your pipeline reflects reality. Start small, test thoroughly, and expand as your team builds trust in the system.
5-Step Checklist for Setting Up Shared Contact Management in CRM
Preparation Steps
Before introducing shared contact management, take time to assess access needs and clean up your data. Skipping these steps can lead to issues like permission conflicts, duplicate entries, and outdated records, which can disrupt your workflow. A well-planned preparation phase ensures a smoother implementation and keeps your team aligned. Here’s how to define roles, tidy up your data, and decide which fields to share.
Identify Team Roles and Access Needs
Start by outlining which team members will interact with contact data and what responsibilities each role entails. For example:
- Sales reps: Need read/write access to contact details, activity logs, and notes.
- Managers: Require broader visibility to oversee all contacts, adjust permissions, run reports, and monitor audit logs.
- Admins: Handle data imports/exports, bulk edits, system settings, and deduplication tasks.
A simple permission matrix can help clarify these roles. For instance, reps might have limited rights to delete records but full access to activity timelines, while managers approve merges and oversee analytics. In Teamgate, you can assign a primary contact owner to maintain accountability, with "collaborators" who can view and contribute without taking over the relationship. This setup avoids confusion, like multiple reps contacting the same prospect, and keeps responsibilities clear. Once roles are mapped out, review your current data for accuracy and relevance.
Review and Clean Existing Contact Data
A clean database is key to maintaining trust in your pipeline. Start by exporting your contact list and removing duplicates, outdated records, or errors such as invalid emails and old addresses. Standardize formats, especially for U.S.-based data, during this process.
Set clear criteria for keeping or removing records. Retain entries with complete required fields, recent activity (within the last 12 months), valid contact information, and links to active deals. Eliminate the rest. Regular audits like this can reduce errors by up to 30% in small business CRMs. Instead of aiming for perfection upfront, start small – share a focused list like "active customers" or "Team A" – and expand gradually, leveraging automated deduplication tools as you go.
Choose Which Contact Fields to Share
Decide which fields are essential for collaboration. Key fields include notes, emails, activity history, next steps, source, and tags. Fields like "last interaction date" and "deal stage" help both sales reps and managers stay aligned, while sensitive details – such as payment information or personal IDs – should remain restricted to admins unless absolutely necessary.
Strike a balance between transparency and privacy by evaluating your workflows. For example, if a rep needs to pick up where a colleague left off, access to a shared activity timeline (which consolidates emails, calls, and meetings) is crucial. On the other hand, sensitive financial data should only be accessible to specific roles. Teamgate’s role-based permissions make this easier by allowing you to designate mandatory fields for "Leads and People" (e.g., Name, Source, Company, Phone, Email) or "Companies" (e.g., Company, Source, Registration number, VAT code). This approach ensures that your shared database remains both comprehensive and secure, promoting disciplined and efficient data management.
sbb-itb-5772723
Set Up Permissions and Access Control
After organizing your data and defining team roles, the next step is ensuring proper access control. Without clear permissions, you risk accidental data loss, oversight issues, or exposing sensitive information. Teamgate’s role-based access controls allow you to fine-tune user permissions, ensuring your contact database stays secure while enabling smooth teamwork. To further safeguard your records, you can activate audit logs to monitor changes.
Assign Role-Based Permissions in Teamgate
In Teamgate, you can assign a primary contact owner and designate collaborators with specific roles, such as view-only or input permissions, depending on departmental needs. As Teamgate explains, "Teamgate allows you to nominate the contact ‘owner’ within the software’s intelligent online contact management feature, and also enables you to add several collaborators who have the ability to spectate communication performance and add their input if necessary". This setup ensures one person is responsible for the relationship, while others can contribute by adding notes, tracking activity, or reviewing progress without altering ownership.
Teamgate’s permission settings let you align access with role definitions. For example:
- Sales reps: Full access to view and update contact details, activity logs, and next steps.
- Managers: Broader visibility, reporting capabilities, and permission management.
- Admins: System-level access for tasks like bulk imports, merges, and security configurations.
If managers maintain separate contact lists, permissions can be customized so they only access their own leads and records, keeping contact management private and organized.
Turn On Audit Logs for Contact Changes
Audit logs provide a detailed history of who accessed or updated contact data and when, helping you maintain accountability and quickly detect unauthorized changes. In Teamgate, these features can be activated through the Security or Settings sections. Managers can also use the Insights module to monitor team activities, such as upcoming meetings and user actions, in real-time. Additionally, assigning multiple team members to a contact using the Collaborations tool creates a comprehensive interaction record. If a deal stalls or a contact goes inactive, you can review the timeline to identify the next steps.
Limit Access to Sensitive Contact Information
Not all team members need access to sensitive details like payment information, personal IDs, or contract terms. With Teamgate, you can restrict access to specific fields, ensuring only authorized users – like finance staff or senior leaders – can view high-value or confidential data. For instance:
- Sales reps: Access to phone numbers, email addresses, and deal stages.
- Finance personnel or leadership: Access to billing details and legal agreements.
Teamgate’s user roles allow for precise access levels:
- View: Can see contact details but cannot make edits.
- Edit: Can update information like phone numbers, emails, and notes.
- Reshare: Can share contact lists with others.
- Owner: Full control, including the ability to delete records or adjust permissions.
This tiered structure ensures smooth collaboration while safeguarding sensitive information. As noted by the Nimble Editorial Team, "Define user roles (e.g., sales, marketing, support) with specific access levels to CRM data. Restrict sensitive customer information to only relevant departments".
Activate Shared Contact Features in Teamgate
Once permissions are set, it’s time to activate collaboration features that keep your team aligned and your data consistent. Shared contact features in Teamgate bring all contact information together in People and Companies, ensuring everyone on your team has access to the same details tied to pipelines, deals, and next steps. This eliminates information silos and reduces the risk of leads slipping through the cracks.
Enable Lead and Contact Management
To centralize contact management, head to the admin settings, navigate to Modules/Features, select Leads & Contacts, and toggle the switch to activate this feature. This setup ensures that all team members have a unified view of contacts across pipelines. Leads captured in one pipeline are automatically added to shared contact lists. By linking contacts to deals with clear stages and next steps, this feature enforces pipeline accuracy. Reps can update contact details during their sales activities, streamlining data entry and keeping the system up-to-date.
Connect Email and Calendar Tools
To integrate email and calendar tools, go to Teamgate’s integration settings, select Email & Calendar, authenticate your Gmail or Outlook account, and configure sync options for emails, events, and attachments. You can choose a sync start point (e.g., now, or 1, 3, or 6 months prior) to log past communications. This automatic syncing feature saves time and ensures that all team communications are recorded in shared contact timelines. For instance, Outlook-synced calendars can flag overdue tasks, helping you avoid neglected leads and silent revenue leaks. Once synced, enable shared timelines to provide real-time visibility into team activities.
Enable Shared Activity Timelines
In the admin panel, go to Activity & Timeline under contact settings and turn on Shared Visibility. This allows your team to access a complete, timestamped history of activities such as emails, calls, notes, meetings, tasks, and deal updates. These shared timelines create a unified view of contact interactions, which supports data-driven decision-making. For example, a timeline might show, "Email sent 02/12/2026: Follow-up proposal", giving leaders a clear picture of deal progress and next steps. This evidence-based approach improves forecast accuracy by grounding it in actual activity rather than speculation.
Tips for a Smooth Activation
Enable these features step by step, testing each one to ensure proper functionality. Skipping permission reviews can lead to data exposure, and inconsistent formatting – like incorrect U.S. currency displays ($1,250.00) – can cause avoidable issues. After activation, run integration tests to confirm that syncing works as expected. Keep in mind that around 20% of setups encounter issues during initial checks, so thorough testing is crucial for a smooth rollout.
Import and Clean Contact Data
Bringing your existing contact data into Teamgate is an essential step to ensure your team starts with a well-organized and reliable database. Proper preparation can help you avoid errors, duplicates, and inconsistencies, setting the stage for disciplined and efficient selling. Here’s how to upload, clean, and link your contacts seamlessly.
Upload Contacts Using CSV or XLS Files
Teamgate supports CSV files with up to 50,000 rows and XLSX files with a maximum of 150,000 cells. To prepare your file for import:
- Use standardized columns, such as Full Name, Email, Phone (formatted as [(XXX) XXX-XXXX]), Company, and ZIP Code.
- Ensure each row includes either a Company or Contact Name.
- Break down address details (e.g., street, city, ZIP code) into separate columns for better filtering.
- If a contact has multiple phone numbers or emails, list them in distinct columns (e.g., "Work Email" and "Personal Email").
To begin the import process, go to the Contacts or Leads section in Teamgate, click Import, upload your file, and map your columns to the appropriate fields in Teamgate. You can speed up this step by naming your file’s columns to match Teamgate’s field names (e.g., "Company Name" or "Tags"). Assign contacts to specific pipelines or roles during the import process. Always preview your mapping and test with a small batch (around 100 contacts) to identify any issues. If no owner is specified, the person performing the import will automatically become the default owner for those contacts.
Merge Duplicates and Fix Formatting
Once your contacts are uploaded, it’s crucial to clean up the data by merging duplicates and standardizing formats. Teamgate automatically flags potential duplicates during the import process, allowing you to merge or remove them. Merging retains important data, like activity history and notes, ensuring nothing valuable is lost. Automated deduplication can reduce duplicate records by 20–30%, minimizing the risk of missed follow-ups.
Formatting issues can also arise, such as inconsistent phone number formats (e.g., 123-456-7890 vs. (123) 456-7890), ZIP codes missing hyphens, or dates not following the MM/DD/YYYY format. Use Teamgate’s bulk editing tools or preprocess your file in Excel to correct these inconsistencies before importing. Excel formulas can be especially helpful for standardizing phone numbers. Additionally, use predefined dropdowns in Teamgate to validate job titles and industries for uniformity. If you notice errors after importing, you can cancel the process within 48 hours through the "Import History" feature.
Connect Contacts to Companies and Deals
For a complete setup, each contact should be linked to its associated company and deal. Teamgate separates data into two categories: People (individuals) and Companies (business entities). To link multiple contacts to the same company during import, simply copy the company’s name into each row for contacts related to that company – you don’t need to repeat the company’s other details.
After importing, use the contact card’s linking feature to associate contacts with companies by searching for company names or domains. You can also enable auto-linking for email domains or bulk-connect contacts using CSV files with company IDs.
"The Companies section holds all business information, like company name and all information about the business entity itself. The People section holds individual personal information, relations, titles, and much more."
- Teamgate CRM Help & Support Hub
Linking contacts to deals ensures activity timelines stay synchronized across records, providing your team with shared access to every email, call, and note tied to each relationship. This visibility helps prevent missed opportunities by highlighting deals that may be aging or at risk. Before wrapping up, have team members test the shared contacts feature, check linked companies and deals, and log activities to confirm everything is syncing as expected.
Test and Launch Shared Contact Management
Before introducing shared contact management to your entire team, run tests to spot and fix any issues with configuration or workflows. Start by creating sample contacts and testing collaboration features. Assign a contact "owner" and add multiple collaborators to confirm that team members can view communication history and contribute updates. Use the Organizer section to test task assignments, adding activities to contacts to ensure follow-ups and next steps are clearly visible to everyone involved. Additionally, check that emails, call logs, and comments are systematically stored in one location and accessible to the right team members.
Run Workflow Tests with Your Team
Once the basic setup is in place, simulate real-life scenarios to validate workflows. Test lead assignments, email exchanges, and task notifications to ensure everything operates smoothly. Add duplicate contacts to check if the system detects them and prompts for merging or removal. Confirm that contact segments automatically update – for example, when a lead transitions to a customer after closing a deal. Test the "My contacts" and "My team’s contacts" views to ensure they work as expected. Finally, verify that all configured integrations function as intended.
Check Mobile App Access
After confirming desktop functionality, extend your testing to mobile devices to ensure consistency across platforms. Since Teamgate supports PC, tablet, and mobile devices, test all core contact management features on both iOS and Android. Verify that shared contacts sync correctly and that updates made on mobile – such as adding notes, changing contact details, or assigning tasks – immediately appear in the shared system. Test mobile features like the SmartDialer™ to confirm in-browser calling, auto-dialing, and call recording work seamlessly. Also, ensure attachments and custom fields sync properly across all devices.
Track Usage and Make Adjustments
The final step is to monitor user engagement and optimize the setup based on real-world usage. Use the Insights section to generate reports that highlight areas needing further attention or training. Track key metrics like daily logins, the number of contacts added or updated, and the frequency of completed tasks and follow-ups. Identify underused features – such as contact tagging or email integration – which may signal the need for additional training or a review of CRM best practices. Use the Organizer section to monitor team activities and upcoming plans, ensuring everyone is leveraging the system effectively. For remote teams, keep an eye on performance metrics like activity levels, outreach, booking rates, deal velocity, pipeline coverage, win rates, deal sizes, quotas, and follow-ups. Plan post-launch reviews at one week, one month, and three months to evaluate adoption and address any training gaps. Use feedback from these reviews to refine workflows and improve feature usage over time.
Conclusion
Setting up shared contact management in Teamgate lays the groundwork for better teamwork, accurate data, and steady revenue growth. When your team operates from a unified activity timeline – where emails, calls, meetings, and notes are all in one place – miscommunication decreases, and everyone stays aligned with the same real-time information. Clean, accurate data prevents duplicate entries and formatting issues that can derail segmentation and reporting down the road. Most importantly, disciplined contact management ensures no lead or deal slips through the cracks, every opportunity has a next step, and every lead gets re-engaged.
Each step in the process builds toward success. Defining roles and permissions clarifies who owns contacts, who can access sensitive information, and who is responsible for keeping the database current. Cleaning your contact data before importing avoids the chaos of fixing errors after the system is already in use. Thoroughly testing workflows helps identify permission gaps, integration issues, and mobile access problems before they disrupt daily operations.
"Never again allow bad contact management cloud your vital decision-making process." – Teamgate
This principle is at the heart of Teamgate’s design, ensuring every update contributes directly to sales outcomes. The system’s user-friendly interface makes setup straightforward and encourages long-term use. Reps stay engaged with the CRM because it genuinely supports their sales efforts, not because they feel pressured to log data. Features like automated follow-ups, a centralized activity timeline, and real-time coaching signals turn the CRM into a tool that safeguards revenue rather than adding administrative headaches. The end result? A reliable, clean pipeline that drives growth and gives leaders clear, actionable insights.
Start with a manageable set of contacts, thoroughly test all functions, and fine-tune workflows based on how your team uses the system. Monitor metrics like daily logins, contact updates, and follow-ups to pinpoint areas needing additional training or adjustments. With the right setup, shared contact management becomes an essential part of your team’s daily workflow, keeping your pipeline strong and your revenue secure. Use this checklist and adapt as you go to maintain a healthy, revenue-focused pipeline.
FAQs
What permission setup prevents reps from contacting the same lead twice?
To avoid the confusion of reps accidentally reaching out to the same lead twice, you can set specific permissions that restrict who can edit or update contact records. By limiting access to authorized users and enforcing workflow rules, you create a system that keeps outreach organized and prevents duplicate efforts.
How should we decide which contact fields to share vs. restrict?
Deciding which contact fields to share or restrict is crucial for balancing collaboration with security. Share fields like communication history or deal status to keep everyone aligned, but restrict sensitive details, such as personal contact information or payment data, to only those who need access. You can customize contact cards to include key details relevant to sales and support teams, ensuring they have the information they need to work effectively. By setting role-based permissions, you can ensure team members access only the data necessary for their responsibilities, safeguarding both privacy and security.
What should we test before rolling out shared contacts to everyone?
Before implementing shared contacts, it’s essential to test a few critical areas to ensure a smooth rollout:
- Permissions and Fields: Double-check that all necessary fields are configured and user permissions are properly set.
- Data Accuracy: Validate imports, confirm custom fields are functioning as expected, and ensure links between contacts and companies are correctly established.
- Integrations: Test syncing across email, calendars, and any other connected tools to avoid disruptions.
- Workflows: Make sure filtering, segmentation, and communication tracking are operating without issues.
- User Adoption: Run a pilot program with a small group to catch potential problems and gather feedback early.