

Data mapping ensures your CRM imports are accurate and efficient by aligning fields from your source file to your CRM system. Errors in mapping can cost companies up to $100 per inaccurate record and waste valuable time. Proper mapping prevents misplaced data, reduces manual updates, and safeguards your pipeline’s integrity. Tools like Teamgate CRM simplify this process with features like automatic field matching, drag-and-drop mapping, and a 48-hour rollback option for error correction.
Key Takeaways:
- Accurate Mapping Saves Time and Money: Prevents errors, improves data quality, and saves 200+ hours annually.
- Automated Tools: Teamgate supports CSV and XLSX imports, auto-creates missing fields, and offers rollback options.
- Preparation is Critical: Clean your source data, standardize formats (e.g., dates, addresses), and create a detailed mapping document.
- Test Before Full Import: Run small test imports to validate mappings and relationships between records.
- Ongoing Automation: Use recurring imports with validation rules to maintain a clean CRM.
Teamgate gives growing sales teams clarity, structure, and trustworthy pipeline insight – without enterprise CRM bloat or feature overload.
Let’s dive deeper into how to prepare, map, and validate your CRM data for seamless imports.
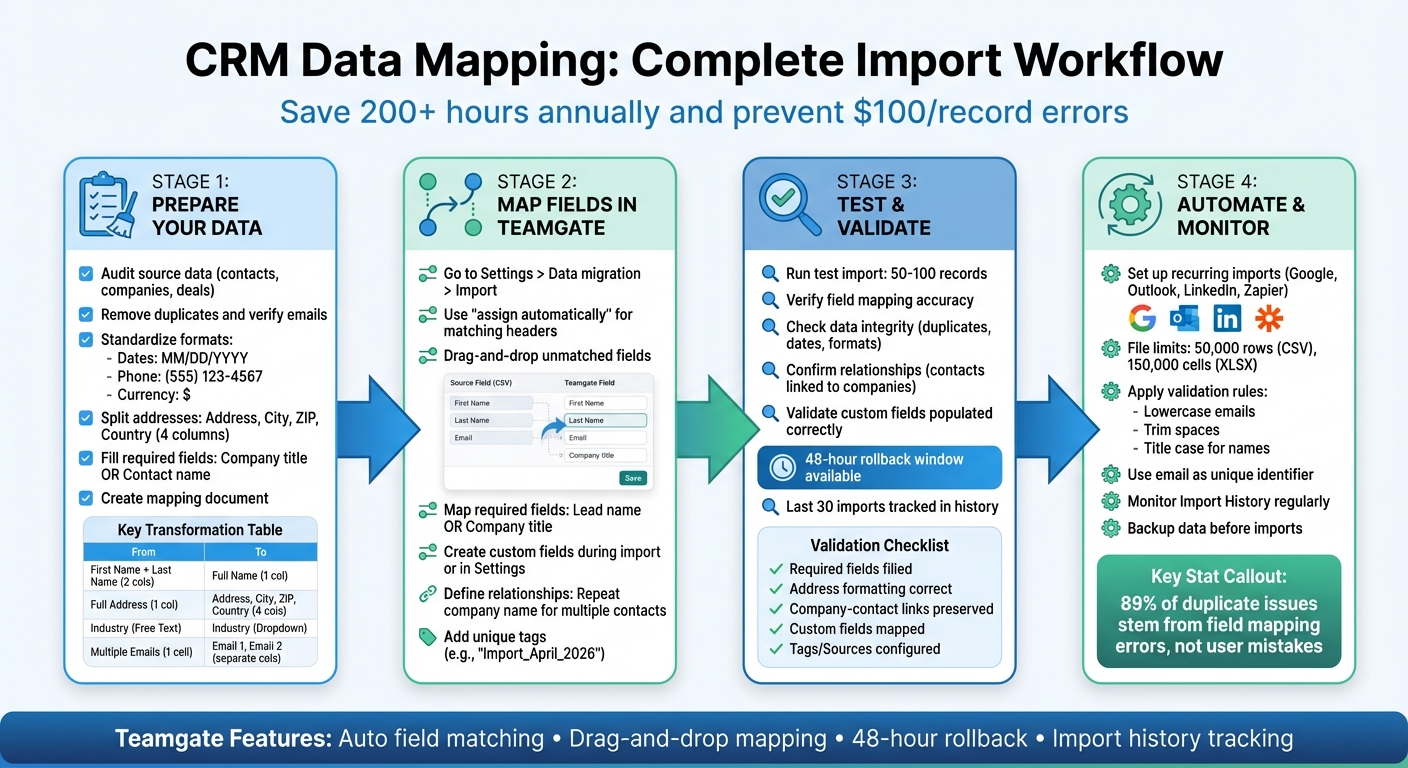
CRM Data Mapping Process: 4-Step Workflow for Accurate Imports
Preparing Your Data for Mapping
Audit Your Source Data
Before diving into data migration, take a close look at your source data. As Chris Algiere from Accelant puts it, this process is like spring cleaning – keep only what’s essential. Start by cataloging your existing data: contacts, companies, deals, activities, and their specific properties. This inventory will help you decide what’s worth carrying over to the new system.
Pay special attention to data scrubbing. Remove duplicates, verify that email addresses are valid for contacts, and ensure companies have domain names. Standardize critical fields like dates (MM/DD/YYYY), phone numbers ((555) 123-4567), and currency (use $). For address data, break it into separate components – Address, City, ZIP, and Country – for easier filtering.
Make sure required fields are filled out. For Teamgate, every record must have at least a Company title or Contact name. If you notice redundant fields serving the same purpose, consolidate them now to simplify your database. And don’t forget to back up your data exports before making any changes.
Once your data is clean, document your approach to mapping it for the new system.
Create a Data Mapping Document
To keep your migration organized, create a detailed spreadsheet that outlines how each field in your current system will map to Teamgate. Include columns for Source Field, Source Type, Target Field, Target Type, and any Transformation Rules. This document acts as your blueprint for moving data. For complex integrations involving multiple data sources, you might also consider using a data integration platform like Integrate.io, which can handle ETL and ELT pipelines to transform and consolidate data from databases, APIs, and other systems before it reaches your CRM.
For instance, if your current system uses "Work Email" and Teamgate uses "Email", note this pairing and specify that both are text fields. If you need to combine "First Name" and "Last Name" into Teamgate’s single "Name" field, include a transformation rule like "Merge First Name + space + Last Name". Documenting these decisions ensures clarity during the migration and makes troubleshooting easier later. Include the reasoning behind each mapping – such as "required for monthly billing reports" – to streamline future updates.
Identify Data Transformation Needs
Some data will need adjustments before it can fit Teamgate’s requirements. Common transformations include splitting full names into first and last names, combining address fields, and converting free-text entries into dropdown options. For example, Teamgate requires names in a single "Full Name" column, so you’ll need to merge separate First Name and Last Name columns.
For addresses, the opposite is true: break full addresses into four columns – Address, City, ZIP, and Country – for better filtering after the import. If your data includes free-text fields like industry classifications, convert these into dropdown (picklist) options in Teamgate to maintain consistency. Set up Tags, Industries, or Sources in Teamgate’s settings ahead of time so they match your imported data. If a contact has multiple email addresses or phone numbers, list them in separate columns (e.g., Email 1, Email 2) instead of combining them into one cell.
| Transformation Type | Source Example | Teamgate Requirement |
|---|---|---|
| Name Formatting | First Name, Last Name (2 columns) | Full Name (1 column) |
| Address Formatting | Full Address (1 column) | Address, City, ZIP, Country (4 columns) |
| Field Type Conversion | Industry (Free Text) | Industry (Dropdown/Picklist) |
| Multiple Values | Email (multiple in 1 cell) | Email 1, Email 2 (separate columns) |
sbb-itb-5772723
Field Mapping Process in Teamgate CRM
Map Core Entities
Once your data is clean and your mapping document is ready, you can start the mapping process in Teamgate. Go to Settings > Data migration > Import or click the Import button in the Leads or People/Companies modules. Follow the instructions to upload your source file.
During the import preview, use the drop-down menus to align each column from your source file with the correct Teamgate field. If your column headers match Teamgate’s field names exactly, the system’s "assign automatically" feature will handle this for you. For unmatched fields, you can drag and drop them into the appropriate Teamgate fields.
Make sure all required fields are mapped correctly. For lead imports, you need to map either "Lead name" or "Company title." For people and company imports, ensure you provide either "Company" or "Contact name". If your source file does not include an "Owner" or "Responsible person" field, Teamgate will automatically assign you as the owner of all imported records. You can exclude any unnecessary columns by unchecking them during the preview.
Once you’ve mapped the core fields, you can move on to setting up custom fields and handling any missing data.
Handle Custom Fields and Missing Data
After core fields are mapped, focus on custom fields to capture unique data. Teamgate gives you two ways to handle custom fields: create them ahead of time via Settings > Customization > Custom fields, or add them directly during the import preview using the provided button. For lead imports, use the Custom fields mapping button to define how custom data will convert into fields for companies, contacts, and deals when a lead is qualified. This step is crucial – skipping it means your custom lead data won’t transfer during conversion. Be sure to map each source column to a corresponding field, or the data won’t be imported.
Once custom fields are addressed, you can define how records relate and set rules to avoid duplicates.
Define Relationships and Duplicate Rules
To link multiple contacts to a single company, repeat the company’s name in the appropriate cells for each related contact. For instance, if three contacts are associated with "Acme Corp", ensure "Acme Corp" is listed in the Company column for all three rows.
To prevent duplicates and track imported records, create a unique tag (like "Import_April_2026") in Settings before starting the import. Add a "Tags" column to your source file with this value to easily identify new records from a specific import batch.
Teamgate keeps a history of the last 30 imports, offering a clear audit trail for your data migration activities. It’s always a good idea to run a small test import first – upload 10–20 rows to confirm that relationships, like Contact-to-Company links, are set up correctly before proceeding with the full import.
Testing and Validating Data Mappings
Run Small Test Imports
Start with a small batch of 50–100 records to ensure the import process works smoothly and your data appears correctly in Teamgate. This step helps maintain data quality while letting you preview how everything will map out. Prepare a sample XLSX or CSV file that includes a variety of field types and relationships from your dataset.
When you preview the mapping, use the "assign automatically" feature for matching column names. For any fields that don’t automatically align, manually drag the source columns to the appropriate fields in Teamgate.
If any issues arise after the test import, you have a 48-hour window to cancel it. Go to Settings > Data migration > Import history > Cancel import to remove the test records and try again. Teamgate also keeps a record of your last 30 imports, giving you a clear audit trail for troubleshooting and validation.
Validate Data Accuracy and Relationships
After importing your test data, take time to verify that all records have been mapped correctly. For example, ensure contacts are properly linked to their respective companies – this means the company name should appear in every row for related contacts in your source file. Open a few sample records to confirm that custom fields have been populated as expected, especially for lead imports, where custom data needs to convert into fields for companies, contacts, or deals.
Watch for common errors, such as incorrect number formats, date fields that don’t parse properly, or ownership assignments defaulting incorrectly. Addressing these issues early ensures smoother full imports later.
Once you’ve validated individual records, use the checklist below to confirm the overall accuracy of your data mapping.
Use a Validation Checklist
After checking sample records, go through this checklist to ensure your data mapping is complete and accurate:
- Field Mapping Accuracy: Confirm all required fields, like Company or Contact name, are correctly filled.
- Data Integrity: Check for duplicates, broken dates, or formatting inconsistencies.
- Relationship Preservation: Verify that contacts are linked to the correct companies and deals are assigned to the right owners.
| Validation Category | Checklist Item | Action |
|---|---|---|
| Core Entities | Required Fields | Ensure Company/Contact name or Lead name is present. |
| Data Integrity | Address Formatting | Split address, city, ZIP, and country into separate columns. |
| Relationships | Company Contacts | Copy the company name into multiple rows for each related contact. |
| Customization | Custom Fields | Set up custom fields in Settings or during the import preview. |
| Categorization | Tags/Sources | Configure Tags, Sources, and Industries in Settings before importing. |
| Post-Import | Rollback Window | Double-check data within 48 hours to preserve the option to cancel. |
Before moving ahead with a full import, test how the imported data interacts with search functions, reporting filters, and automation triggers. This step helps you catch any unexpected outcomes, such as imported values triggering existing workflows or producing incorrect results.
How to Plan a Successful CRM Data Migration
Automating Imports in Teamgate CRM
Automating data imports in Teamgate ensures your CRM stays accurate and reliable, saving time and reducing errors.
Set Up Recurring Imports
Teamgate supports recurring imports through integrations with tools like Google Contacts, Outlook, LinkedIn, and platforms such as Zapier and Make.com. To make the process seamless, ensure your source file headers match Teamgate’s field names precisely. For instance, when importing leads weekly, include a "Tags" column to easily differentiate new contacts from existing ones. Keep in mind, CSV imports can handle up to 50,000 rows, while XLSX files support up to 150,000 cells for People/Company imports and 5,000 cells for leads.
Set Validation Rules and Monitor Imports
Data validation is key to maintaining a clean CRM. Convert emails to lowercase, trim unnecessary spaces, and apply title case for names and company fields. Use "Email" as the unique identifier and enable upsert logic to prevent duplicate entries.
"Field mapping is the single highest-leverage duplicate prevention mechanism. One correct mapping configuration prevents thousands of duplicates." – The Sports Angel
In fact, nearly 89% of duplicate issues in CRM databases stem from field mapping errors rather than user mistakes. To further ensure data accuracy, validate email formats to achieve 0% missing values and keep invalid formats below 1%. Regularly review the Import History (found at Settings > Data migration > Import history), which logs the last 30 imports.
After setting up validation rules, secure the process with proper backup plans.
Plan Backup and Rollback Strategies
Before starting a new import, export your current data as a backup. Teamgate also offers a "Cancel import" feature, allowing you to undo an import within 48 hours. If issues arise after an automated import, go to Settings > Data migration > Import history and use the "Cancel import" option to restore your database to its earlier state. For larger imports, consider scheduling downtime to make it easier to pinpoint and address any discrepancies caused by the process.
Conclusion
Benefits of Data Mapping
Data mapping transforms CRM imports from a potential headache into a smooth, reliable process. By breaking down address components into separate columns, matching headers to trigger automatic field alignment, and testing with a small sample before a full upload, you can avoid errors that disrupt your pipeline. This minimizes duplicate records, mismatched fields, and ensures your team has a trustworthy database for accurate forecasting and follow-ups.
Teamgate adds an extra layer of confidence with features like a 48-hour rollback window and import history tracking, giving you the flexibility to act quickly without fear of permanent mistakes. The true payoff isn’t just cleaner data – it’s the consistent revenue growth that comes from a CRM designed to support selling, not bog you down with administrative tasks. With these tools and strategies, you can streamline your CRM data import process for better outcomes.
Next Steps for Teamgate Users
Start by auditing your source files to confirm that company names, contact details, and address fields are properly separated. Then, create a mapping document that aligns your source columns with Teamgate’s fields – this will serve as a reusable template, saving you time on future imports.
Run a test with 50–100 rows to check for data accuracy. Ensure relationships between companies and contacts are maintained, custom fields populate correctly, and tags are applied as intended. Once satisfied with the mapping, proceed with the full database import confidently. For ongoing imports, ensure your source file headers consistently match Teamgate’s fields.
To maintain data integrity over time, establish validation rules, such as standardizing email formats and trimming extra spaces. This disciplined approach will keep your pipeline clean, focused, and ready to drive predictable revenue. Teamgate helps you achieve this by providing clarity, structure, and a CRM your team will actually use.
FAQs
What’s the fastest way to clean my file before importing?
Before importing your file into a CRM like Teamgate, it’s essential to clean and organize your data for a smooth upload. Start by removing duplicate entries and ensuring consistent formatting across all fields. Verify that your file meets the required formats, such as CSV or XLSX, and that the column structure aligns with the CRM’s guidelines. Standardize elements like dates and phone numbers, merge duplicate contacts or companies, and use data validation tools to spot and fix errors. These steps will help ensure your import is accurate and hassle-free.
How do I map custom fields to ensure lead data transfers correctly?
To ensure a smooth CRM import process, it’s important to map custom fields accurately. Here’s how to do it:
- Match each custom field in your source data to the appropriate CRM field.
- Create or update CRM fields if they don’t already exist.
- Set up validation rules to maintain data consistency.
- Test the mapping with a small sample of data to check for errors and avoid mismatches.
Taking these steps will help you transfer data cleanly and reliably.
What should I check in a test import before importing everything?
Before moving all your data into Teamgate CRM, it’s a good idea to perform a test import first. This helps ensure everything runs smoothly. Here’s what to check during the process:
- Field Matching: Make sure the fields in your file correctly correspond to the fields in Teamgate to prevent mismatches.
- File Format and Size: Confirm your file is either in CSV or XLSX format and meets the size requirements.
- Data Accuracy: Review the imported data to ensure it’s complete and accurate.
- Filtering: Check that imported contacts are unique and that filtering options work as intended.